Skip to content Skip to main navigation Skip to footer

Blog

عرض وفلترة السلات المتروكة

[mhc_section admin_label=”قسم” fullwidth=”on” specialty=”off”][mhc_fullwidth_post_header admin_label=”عنوان المقالة بعرض كامل” title=”on” meta=”off” avatar=”off” author=”off” date=”off” categories=”off” comments=”off” views=”off” show_ratings=”off” show_excerpt=”off” show_share=”on” text_orientation=”center” text_color=”dark” featured_image=”on” featured_placement=”below” parallax=”off” parallax_method=”off” bg_color=”#dddddd” custom_paddings=”40″ size=”26px” title_bold=”on” text_shadow=”off” text_background=”off” text_bg_color=”#ffffff” overlay=”on” animation=”off”] [/mhc_fullwidth_post_header][/mhc_section][mhc_section admin_label=”section”][mhc_row admin_label=”row”][mhc_column type=”4_4″][mhc_text admin_label=”نص” background_layout=”light” text_orientation=”right” animation=”off”]

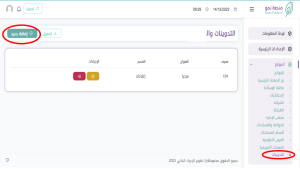
كيفية عرض وفلترة السلات المتروكة

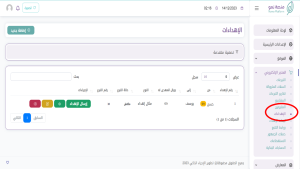
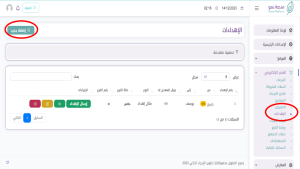
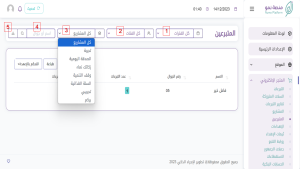
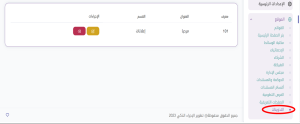
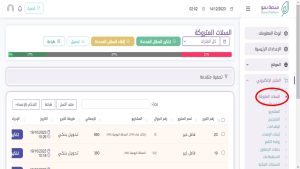
1) من القائمة الموجودة في جهة اليمين نقوم باختيار المتجر الإلكتروني >  السلات المتروكة

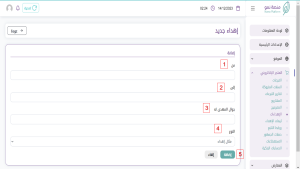
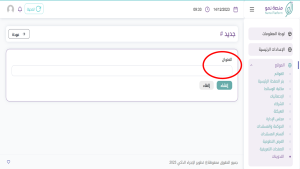
2) يمكن تخصيص السلات المتروكة بالطريقة التالية :

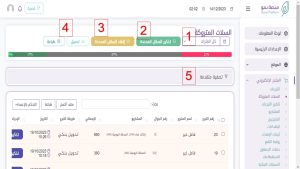
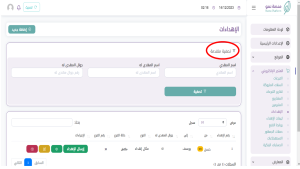
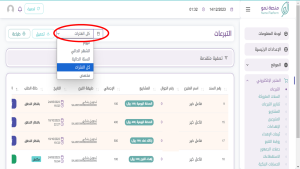
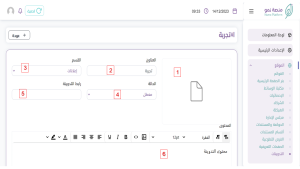
  1. تحديد فترة السلات المتروكة
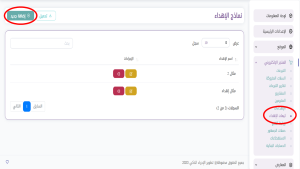
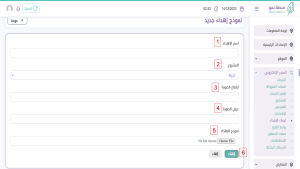
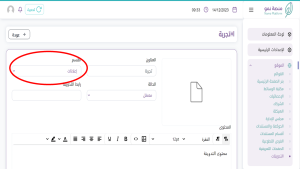
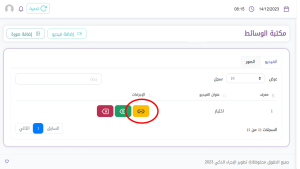
  2. تحديد عدد من السلات ثم ارسال تذكير مباشر ( عن طريق الرسائل النصية او الواتس اب بناء على الخدمة التي اشتركت فيها الجمعية )
  3. الغاء التحديد
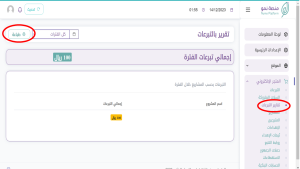
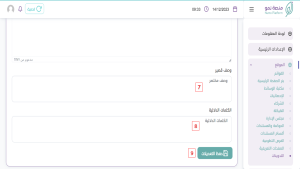
  4. تحميل وطباعة تقرير معلومات الرسائل
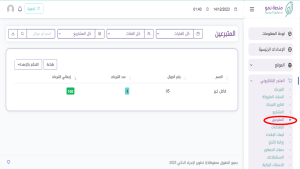
  5. يمكن استخدام التصفية المتقدمة لإظهار السلات المتروكة بشكل أكثر تحديدا
[/mhc_text][/mhc_column][/mhc_row][/mhc_section]

عرض وفلترة الإهداءات

[mhc_section admin_label=”قسم” fullwidth=”on” specialty=”off”][mhc_fullwidth_post_header admin_label=”عنوان المقالة بعرض كامل” title=”on” meta=”off” avatar=”off” author=”off” date=”off” categories=”off” comments=”off” views=”off” show_ratings=”off” show_excerpt=”off” show_share=”on” text_orientation=”center” text_color=”dark” featured_image=”on” featured_placement=”below” parallax=”off” parallax_method=”off” bg_color=”#dddddd” custom_paddings=”40″ size=”26px” title_bold=”on” text_shadow=”off” text_background=”off” text_bg_color=”#ffffff” overlay=”on” animation=”off”] [/mhc_fullwidth_post_header][/mhc_section][mhc_section admin_label=”section”][mhc_row admin_label=”row”][mhc_column type=”4_4″][mhc_text admin_label=”نص” background_layout=”light” text_orientation=”right” animation=”off”]

كيفية عرض وفلترة الإهداءات

1) من القائمة الموجودة في جهة اليمين نقوم باختيار المتجر الإلكتروني >  الإهداءات

2) يمكن استخدام التصفية المتقدمة لإظهار نتائج أكثر تحديدا

ملاحظة : يمكن التعديل على الإهداء أو حذفه او إعادة ارسالة مجددا للعميل عن طريق أزرار التحكم الظاهرة بالصورة بجانب الإهداء

[/mhc_text][/mhc_column][/mhc_row][/mhc_section]

إضافة وضبط ثيمات الإهداء

[mhc_section admin_label=”قسم” fullwidth=”on” specialty=”off”][mhc_fullwidth_post_header admin_label=”عنوان المقالة بعرض كامل” title=”on” meta=”off” avatar=”off” author=”off” date=”off” categories=”off” comments=”off” views=”off” show_ratings=”off” show_excerpt=”off” show_share=”on” text_orientation=”center” text_color=”dark” featured_image=”on” featured_placement=”below” parallax=”off” parallax_method=”off” bg_color=”#dddddd” custom_paddings=”40″ size=”26px” title_bold=”on” text_shadow=”off” text_background=”off” text_bg_color=”#ffffff” overlay=”on” animation=”off”] [/mhc_fullwidth_post_header][/mhc_section][mhc_section admin_label=”section”][mhc_row admin_label=”row”][mhc_column type=”4_4″][mhc_text admin_label=”نص” background_layout=”light” text_orientation=”right” animation=”off”]

كيفية إضافة وضبط ثيمات ( بطاقات ) الإهداء 

1) من القائمة الموجودة في جهة اليمين نقوم باختيار المتجر الإلكتروني >  ثيمات الإهداء > إضافة جديد

2) نقوم بتعبئة بيانات الإهداء بالشكل التالي :

  1. اسم الاهداء ( يجب ان يوضح الإسم نوع الإهداء مثل : عام , نسائي , رجالي , للأم  ولعيد الفطر وهاكذا )
  2. اختيار المشروع الذي يخص الإهداء والذي ستحسب له تبرعات الإهداء
  3. نقوم بإضافة ارتفاع الصورة ( بالبكسل مثال : 1500 )
  4. نقوم بإضافة عرض الصورة ( بالبكسل مثال : 1500 )
  5. نقوم برفع صورة التصميم المعدة مسبقا من الجهاز
  6. نضغط على إنشاء حتى ننتقل للواجهة التالية

  1. ستظهر معاينة حية للصورة التي تم إرفاقها
  2. يمكن إعادة تعيين إسم الإهداء من هذا الخيار
  3. يمكن تغيير المشروع المرتبط من هذا الخيار
  4. تعطيل او تفعيل الإهداء ( في حال كونه معطل لن يظهر في المتجر )
  5. ترتيب الظهر تحدد ترتيب ظهور القالب مع بقية القوالب
  6. تحديد حجم الخط الذي سيظهر فيه النص ( يمكن مشاهدة الخط في المعاينة الحية والتعديل على اساسها )
  7. تحديد لون خط النص
  8. تحديد الموقع الأفقي لظهور اسم المهدى له على التصميم
  9. تحديد الموقع العامودي لظهور اسم المهدى له على التصميم
  10. تحديد الموقع الأفقي لظهور اسم المهدي على التصميم
  11. تحديد الموقع العامودي لظهور اسم المهدي على التصميم
  12. لا تنسى الضغط على زر الحفظ لحفظ التعديلات

ملاحظة : المقصود بحجم ولون الخط هو فقط اسم المهدي والمهدى له فقط ، اي ان نصوص اخرى موجودة في التصميم سابقا لن تتغير ولن يتم التعديل عليها

[/mhc_text][/mhc_column][/mhc_row][/mhc_section]

إضافة إهداء يدوي

[mhc_section admin_label=”قسم” fullwidth=”on” specialty=”off”][mhc_fullwidth_post_header admin_label=”عنوان المقالة بعرض كامل” title=”on” meta=”off” avatar=”off” author=”off” date=”off” categories=”off” comments=”off” views=”off” show_ratings=”off” show_excerpt=”off” show_share=”on” text_orientation=”center” text_color=”dark” featured_image=”on” featured_placement=”below” parallax=”off” parallax_method=”off” bg_color=”#dddddd” custom_paddings=”40″ size=”26px” title_bold=”on” text_shadow=”off” text_background=”off” text_bg_color=”#ffffff” overlay=”on” animation=”off”] [/mhc_fullwidth_post_header][/mhc_section][mhc_section admin_label=”section”][mhc_row admin_label=”row”][mhc_column type=”4_4″][mhc_text admin_label=”نص” background_layout=”light” text_orientation=”right” animation=”off”]

كيفية إضافة إهداء يدوي

1) من القائمة الموجودة في جهة اليمين نقوم باختيار المتجر الإلكتروني >  الإهداءات > الضغط على زر إضافة جديد

2) تعبئة البيانات بالشكل التالي :

  1. أسم المرسِل
  2. أسم الشخص المهدى له
  3. جوال الشخص المهدى له
  4. اختيار ثيم الإهداء ( نوع البطاقة : تخرج .. مواليد .. بناء على البطاقات المضافة من قبل الجمعية )
  5. الضغط على إضافة
[/mhc_text][/mhc_column][/mhc_row][/mhc_section]

إصدار تقارير التبرعات

[mhc_section admin_label=”قسم” fullwidth=”on” specialty=”off”][mhc_fullwidth_post_header admin_label=”عنوان المقالة بعرض كامل” title=”on” meta=”off” avatar=”off” author=”off” date=”off” categories=”off” comments=”off” views=”off” show_ratings=”off” show_excerpt=”off” show_share=”on” text_orientation=”center” text_color=”dark” featured_image=”on” featured_placement=”below” parallax=”off” parallax_method=”off” bg_color=”#dddddd” custom_paddings=”40″ size=”26px” title_bold=”on” text_shadow=”off” text_background=”off” text_bg_color=”#ffffff” overlay=”on” animation=”off”] [/mhc_fullwidth_post_header][/mhc_section][mhc_section admin_label=”section”][mhc_row admin_label=”row”][mhc_column type=”4_4″][mhc_text admin_label=”نص” background_layout=”light” text_orientation=”right” animation=”off”]

كيفية إصدار تقارير التبرعات 

توجد طريقتين لإصدار تقرير بالتبرعات :

1) الطريقة الأولى : من القائمة الموجودة في جهة اليمين نقوم باختيار المتجر الإلكتروني >  التبرعات > الضغط على تحميل لتنزيل ملف الأكسل

2) الطريقة الثانية : من القائمة الموجودة في جهة اليمين نقوم باختيار المتجر الإلكتروني >  تقارير التبرعات > الضغط على طبعاة لطباعة التقرير بشكل مباشر

[/mhc_text][/mhc_column][/mhc_row][/mhc_section]

عرض وفلترة بيانات المبترعين

[mhc_section admin_label=”قسم” fullwidth=”on” specialty=”off”][mhc_fullwidth_post_header admin_label=”عنوان المقالة بعرض كامل” title=”on” meta=”off” avatar=”off” author=”off” date=”off” categories=”off” comments=”off” views=”off” show_ratings=”off” show_excerpt=”off” show_share=”on” text_orientation=”center” text_color=”dark” featured_image=”on” featured_placement=”below” parallax=”off” parallax_method=”off” bg_color=”#dddddd” custom_paddings=”40″ size=”26px” title_bold=”on” text_shadow=”off” text_background=”off” text_bg_color=”#ffffff” overlay=”on” animation=”off”] [/mhc_fullwidth_post_header][/mhc_section][mhc_section admin_label=”section”][mhc_row admin_label=”row”][mhc_column type=”4_4″][mhc_text admin_label=”نص” background_layout=”light” text_orientation=”right” animation=”off”]

كيفية عرض وفلترة بيانات المبترعين

1) من القائمة الموجودة في جهة اليمين نقوم باختيار المتجر الإلكتروني >  المتبرعين

2) يمكنك فلترة المتبرعين بالشكل الآتي :

  1. تحديد فترة التبرع
  2. تحديد فئة التبرع ( متكرر او تبرع واحد )
  3. تحديد المشروع الذي تم التبرع له
  4. البحث بإسم المتبرع او رقم جوال
  5. يمكن استخدام هذا الزر لتحميل ملف اكسل يحتوي على بيانات المتبرعين المحددين بعد استخدام الفلتر
[/mhc_text][/mhc_column][/mhc_row][/mhc_section]

عرض وفلترة جميع التبرعات

[mhc_section admin_label=”قسم” fullwidth=”on” specialty=”off”][mhc_fullwidth_post_header admin_label=”عنوان المقالة بعرض كامل” title=”on” meta=”off” avatar=”off” author=”off” date=”off” categories=”off” comments=”off” views=”off” show_ratings=”off” show_excerpt=”off” show_share=”on” text_orientation=”center” text_color=”dark” featured_image=”on” featured_placement=”below” parallax=”off” parallax_method=”off” bg_color=”#dddddd” custom_paddings=”40″ size=”26px” title_bold=”on” text_shadow=”off” text_background=”off” text_bg_color=”#ffffff” overlay=”on” animation=”off”] [/mhc_fullwidth_post_header][/mhc_section][mhc_section admin_label=”section”][mhc_row admin_label=”row”][mhc_column type=”4_4″][mhc_text admin_label=”نص” background_layout=”light” text_orientation=”right” animation=”off”]

كيفية عرض وفلترة جميع التبرعات

1) من القائمة الموجودة في جهة اليمين نقوم باختيار المتجر الإلكتروني >  التبرعات

2) يمكنك تحديد فترة التبرعات من خلال الضغط على الزر بالاسفل

3) كما يمكنك استخدام التصفية المتقدمة لتحديد التبرعات خلال الفترة المختارة بناء على طريقة الدفع او حالة الطلب او كليهما ثم الضغط على زر تصفية

[/mhc_text][/mhc_column][/mhc_row][/mhc_section]

تغيير قسم مدونة

[mhc_section admin_label=”قسم” fullwidth=”on” specialty=”off”][mhc_fullwidth_post_header admin_label=”عنوان المقالة بعرض كامل” title=”on” meta=”off” avatar=”off” author=”off” date=”off” categories=”off” comments=”off” views=”off” show_ratings=”off” show_excerpt=”off” show_share=”on” text_orientation=”center” text_color=”dark” featured_image=”on” featured_placement=”below” parallax=”off” parallax_method=”off” bg_color=”#dddddd” custom_paddings=”40″ size=”26px” title_bold=”on” text_shadow=”off” text_background=”off” text_bg_color=”#ffffff” overlay=”on” animation=”off”] [/mhc_fullwidth_post_header][/mhc_section][mhc_section admin_label=”section”][mhc_row admin_label=”row”][mhc_column type=”4_4″][mhc_text admin_label=”نص” background_layout=”light” text_orientation=”right” animation=”off”]

تعديل قسم مدونة 

1) من القائمة الموجودة في جهة اليمين نقوم باختيار التدوينات >  ثم الضغط على زر التعديل بجانب المدونة المرغوب التعديل عليها

2) نقوم بالتعديل من خلال اختيار قسم جديد ثم الضغط على حفظ التغييرات

[/mhc_text][/mhc_column][/mhc_row][/mhc_section]

إضافة مدونة جديدة

[mhc_section admin_label=”قسم” fullwidth=”on” specialty=”off”][mhc_fullwidth_post_header admin_label=”عنوان المقالة بعرض كامل” title=”on” meta=”off” avatar=”off” author=”off” date=”off” categories=”off” comments=”off” views=”off” show_ratings=”off” show_excerpt=”off” show_share=”on” text_orientation=”center” text_color=”dark” featured_image=”on” featured_placement=”below” parallax=”off” parallax_method=”off” bg_color=”#dddddd” custom_paddings=”40″ size=”26px” title_bold=”on” text_shadow=”off” text_background=”off” text_bg_color=”#ffffff” overlay=”on” animation=”off”] [/mhc_fullwidth_post_header][/mhc_section][mhc_section admin_label=”section”][mhc_row admin_label=”row”][mhc_column type=”4_4″][mhc_text admin_label=”نص” background_layout=”light” text_orientation=”right” animation=”off”]

كيفية إضافة مدونة جديدة 

1) من القائمة الموجودة في جهة اليمين نقوم باختيار المموقع >  التدوينات ,إضافة جديد

2) نقوم بكتابةعنوان للتدوينة

3) نقوم بتعبئة البيانات بالشكل التالي :

  1. إضافة صورة التدوينة
  2. يمكن اعادة تعيين عنوان التدوينة من هذا الخيار
  3. تحديد قسم التدوينة ( اخبار , مقالات , فرص وظيفية …. )
  4. تعطيل او تفعيل التدوينة ( حين كونها معطلة لن تظهر في المتجر )
  5. يمكن اضافة رابط مخصص لتدوينة ( يتم كتابة الجزء الذي ترغب بظهوره بعد دومين المتجر الاساسي فقط ولا يتم اضافة رابط المتجر كامل – في حال ترك هذا الخيار فارغ سيقوم النظام بإنشاء رابط تلقائي )
  6. اضافة محتوى التدوينة
  7. إضافة الصوف المختصر الذي سيظهر كنبذة اسفل صورة التغريدة
  8. إضافة كلمات دلالية تساعد في ظهور المقالة بشكل افضل مثل الكلمات المفتاحية
  9. حفظ التدوينة

ملاحظة : يمكن حذف التدوينة عند الضغط على زر الحذف الأحمر ثم تأكيد

[/mhc_text][/mhc_column][/mhc_row][/mhc_section]

نسخ رابط الوسائط

[mhc_section admin_label=”قسم” fullwidth=”on” specialty=”off”][mhc_fullwidth_post_header admin_label=”عنوان المقالة بعرض كامل” title=”on” meta=”off” avatar=”off” author=”off” date=”off” categories=”off” comments=”off” views=”off” show_ratings=”off” show_excerpt=”off” show_share=”on” text_orientation=”center” text_color=”dark” featured_image=”on” featured_placement=”below” parallax=”off” parallax_method=”off” bg_color=”#dddddd” custom_paddings=”40″ size=”26px” title_bold=”on” text_shadow=”off” text_background=”off” text_bg_color=”#ffffff” overlay=”on” animation=”off”] [/mhc_fullwidth_post_header][/mhc_section][mhc_section admin_label=”section”][mhc_row admin_label=”row”][mhc_column type=”4_4″][mhc_text admin_label=”نص” background_layout=”light” text_orientation=”right” animation=”off”]

نسخ رابط الوسائط

1) يمكنك نسخ رابط الوسائط ومشاكرتها في اي مكان عن طريق نسخ الرابط بالضغط على الزر التالي :

[/mhc_text][/mhc_column][/mhc_row][/mhc_section]